Sunday, January 4, 2015

Garden Design Ramblings

Our house was built in 1926, and the garden has 'evolved' over the past 89 years.  A lot of the features  (the pavers, the planting beds, the walls, outbuildings, the overall layout) have seen wear and could use a facelift.  Since moving in, we've been trying to work with what we have for a temporary solution.  Over the next few years, we're planning to make a bigger change, and are working with a landscape designer to help with the process.

We have a few things to consider:
Steep driveway
Concrete bomb shelter (air raids shelter) we'd like to keep
Kids 
Maintenance

We've been gathering ideas since we bought the house.  On New Year's Day, I walked around the neighbourhood with Niall's mom to discuss options and take pictures.

1.  Summerhouse:  Niall wants one, by the bomb shelter.  He likes this one (sans garbage can) around the corner from us.  I'm hoping for some direction on how to incorporate Niall's summerhouse vision with the bomb shelter and a place to store things if we rip down the garage.  (For a side extension.)


2.  Usable, flat(ish) garden with paving and an out building.  Our garden has a slight change in elevation, but not enough to cause a problem.   We'd like the back yard to be somewhere the we can spend time as a family, but keep it fairly low maintenance and keep things cohesive. I like the clean lines of this garden.  When I walk by, I notice it and things it looks nice.


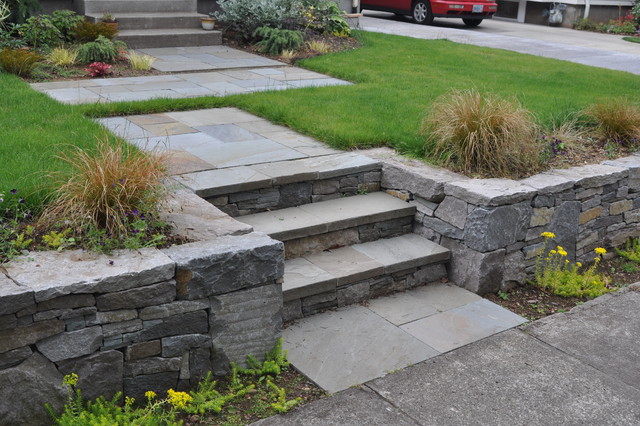
3.  Steps up to the house:  We're looking for a new set-up for the entrance to our house.  Right now it's steps along the driveway which isn't very welcoming and makes the driveway a tight squeeze.


We're looking to introduce steps in line with our front door.  Something kind of like this:


One neighbour has done this:


Another has built a retaining wall to level their steep driveway.


Another has steps leading from the driveway to the front door (instead of along the driveway)


And another has their steps along the drive but almost in line with the front door.  (Making the driveway wider and the front garden a little smaller.)


This house doesn't have the pitch in the front garden that we do, but they have a walkway straight from the pavement to their front door.


Walkway from pavement to front door.  (But with entrance on the side of the house.)


I like the low profile front wall, where the top of the wall is almost level with the ground behind it.  (Our current front retaining wall is about a foot higher the the ground.)


Niall likes a low profile, but wants to add a metal railing on top.


In time, we're planning to add a side extension.  But our driveway is steeper.  (I do like how this extension looks.)


Another pitched drive, with a retaining wall for the garden.


One other thing we both like is the idea of adding a pergola (possibly with glass inserts to help with the rain) possibly in the back garden.  Down the road someone has a metal and glass carport, a design along these lines may work.  

We'll see.  For now I'm remind myself how far we've come from when we saw the house two years ago.


Thursday, January 1, 2015

Mini-Bedroom Makeover

Niall's dad passed away this year.  Niall's parents raised four kids in a two bedroom house.  The bedroom they had shared for almost 40 years was full of memories, and hadn't been done up in a really long time.  Niall's mom had purchased paint and wallpaper a while ago, saving it for when the time would come to redo the room.

Niall's mom had been putting pennies away for a long time to go visit family in Australia, so some time after the funeral she went on the trip for about a month.  Niall and his siblings decided to surprise his mom by making a few changes while she was gone.  (We hinted at it and got her go ahead and feedback on what she'd like.)

I took 'before' pictures when we were clearing out the house after Niall's dad had passed away.
Niall's mom had already bought new wallpaper for above the bed (it was the only wall she wanted papered.)  She wanted to keep their headboard, but thought painting it white would be nice.  So we did.


And now?  A new look!  


Some of the walls needed the old wallpaper removed, so we went up (we live about 60 miles away) on weekends and would work on the room while our kids slept next door.  One of the best parts of the surprise was working with the family.  Niall's brother removed the carpets, arranged for new ones and helped paint.  Niall's sister and her partner wallpapered and painted.  It was like a baton relay over several weeks, where everyone would help when possible. We separated Niall's dad's belongings and boxed up things we weren't sure about, for Niall's mom to go through later.


The walls, ceiling and skirting got new paint.  We also got new carpet for the room.  The floor mirror opens and has jewelry storage inside.  

The closet/wardrobes doors weren't working.  We repainted them and fixed the hardware so they now slide past each other.


We got rid of things that we had permission to dispose of.  After Niall's mom got home to her surprise, she has continued to 'freshen up' her room, getting curtains, accessories, linens and hanging pictures to her taste.  Her sister has even come up from London a few times to help with the makeover!


It was a fun, messy, hard, feel-good project and we hope Niall's mom enjoys her bedroom!

Monday, October 20, 2014

Murphy Bed/Pull-Out Wall Bed

We have this funky box in the small bedroom.  Part of the room's floor space is taken up by a cut-out for the head height for the main stairs, which was boxed in.


Originally we painted and sanded back some of the wood.


For a while it was a hodgepodge of storage for clothes.  But that got sorted with the wardrobes.


The small room used to be where both kids slept, but now that the loft is done and they have their own bigger room, the small room is now the office.  Complete with a fold-down desk.


The stair-box was just there.  And I 'need' the office (I'm working from home.)  But we wanted an extra guest bed.  I've had this dream of having a Murphy bed since I was about ten.  So we finally just went for it.  Because of the box and the room dimensions, we had to go for a unique and bespoke design.  The joiner patiently built it, and it only just fits.  The shelf flips down as the bed base legs when the bed is pulled down.  The frame is hardwood (mahogany) because the mechanisms inside are super strong.  (We got the Urmstrom Mechanism from Ibedz.  That's after calling six different suppliers to find out their technical specifications.)  The pull is so strong that MDF and pine (or other soft woods) would warp.  The joiner had to sit on the frame to get the mechanism to stay down before the facing and mattress were added.


You would not believe the amount of research, time and thought that went into this bed.  It's almost pathetic how much discussion and investigation went into this thing.  And the geometry!


Due to the overall weight, we had wooden panelling put on the face instead of MDF or solid wood.  Which led to Niall (ever the interior decorator) suggesting black and white stripes.  Sure, why not?  I love spending eight hours painting minute details.


And, well, here it is.  A ten-year-old-me...dream come true!  A whole bed hidden behind a door.


Once down, it's a pretty comfortable bed.  It is a bit high (again, due to the stair-box dimensions) but we have steps to help climb up.


Most of the time it just looks like a weird, random piece of furniture.  At some time I plan to put something in the 'frames' of the shelves/fold down bed supports (in red.)


Until then, the ridiculousness of it makes me smile every time I turn around from working at the desk.  (As an aside, the light was just a bit too low.  The bed would hit it when folded down, so an electrician friend came and moved it up a few inches.)  And, honestly, sleeping on the Murphy bed really beats sleeping on the air mattress.


It turns out my ten-year-old dream wasn't cheap.  For years I have looked for an inexpensive (i.e. cheap) way to get a decent wall bed.  But I haven't never found one (the mechanisms alone are a fortune, and I didn't want to risk pinched fingers) so we bit the bullet.

Murphy Bed Project Cost

Labor and materials:  £485
Mechanism:  £160
Paint:  £30
Total:  £675

Friday, September 26, 2014

Wardrobes-Part Three

Finally!  The wardrobes are done!


As a reminder, we played the great furniture switcheroo to get the wardrobes and then I painted and painted.  The wardrobes were at this point...and that's where they've stayed.  They are a bit tilted, but have been so great!  Lots of great storage, pull-out drawers, easy access for two little girls.


We waited until Kenny the Joiner had a space in his schedule.  This week it was our turn!  In one day, he built a base to raise the wardrobes, placed and leveled the storage, and boxed everything in.


We had every inch of skirting and facing in the house painted 16 months ago and every bit of it has yellowed.  Perhaps you can tell in the photo below where the skirting/base board is yellow and the doors are white.  Maybe not?  But in person, very apparent!


Kenny put in some fancy crown molding, and reattached the doors.


I painted some more and voila!  The girls' wardrobe is all done.  I told the girls Kenny came to make their wardrobes fancy, and I think he did a pretty excellent job!


Project Breakdown

Furniture £65
Paint and Supplies £60
Labor £150
Total £275

It has taken all summer, but it's so much easier to go from this


To this!

Sunday, September 14, 2014

Bird Chandelier

The bare lightbulb hanging from the ceiling is kind of okay by me.  We've had the 'look' is almost every room in the house for a year.  Our babysitter finally told me that it looked kind of pathetic, but she said it in a nicer way.

For the girls' room, I decided to make a 'bird chandelier'.  Something like this.  I tried and tried to find a reasonably priced wire pendant lamp shade.  I'd heard Ikea had some (like a lamp covered in paper that had wire underneath), but after several visits I came home empty handed.

Finally, one night I just bought a cheap lamp shade, tore it apart, and used wire to 'weave' a very homespun looking cage.  With a baby wipe box as a support.


I spray painted it, and then looked high and low for imitation birds.  Holy Hannah, they're hard to find.  I miss Michael's and the abidance of fake birds for pennies the US has on offer.  I finally broke down and purchased six birds on clips from pippi.  With a discount code and shipping I think they were around £20.


Hello birds!


And finally, the naked pendant light is covered, kind of.  The girls love the light and consider it a treat if I unclip the birds and let them hold them for a few minutes.


Saturday, July 26, 2014

Garden Swing (Buyer Beware!)

Last week Niall sat on a garden swing at B&Q and his mind was made.  We needed a swing, and he was on a hunt to find it.  Wednesday morning Niall came through to the kitchen.  He was, dare I say it, giddy!  Niall had found a swing on Gumtree that looked pretty amazing.  It retails for £400 new.  And the ad said it was 'never used', so at £65 it seemed like a great deal.  We called, emailed and texted the seller to say we would take it.  I was afraid someone would get it before Niall!

Niall talked to the seller, who told us the swing was unassembled and had fit in his Mondeo (it's a four seater car, smaller than our MPV.)   I thought I was picking up a brand new, unused gazebo swing that would fit in the car no problem.  I drove the 40 minutes to pick it up without any tools or bungee cords.  Doesn't the ad make the swing seem great?

SWING SEAT ARCHWAY, £65  

Never used but needs assembled


When I actually saw the swing, I was surprised.  Not in a good way.  I almost said, "No Thanks."  But then I remembered how giddy Niall had been at the prospect of a gazebo swing.  The 'swing' may not have been used, but it had been left in the damp to rot.  The gazebo part had obviously been in use and left to the elements.  And then taken apart, with all of the nuts and bolts misplaced.  The whole thing was big, moldy and barely fit in the car.  The seller let me have some wire to tie the parts down and I took the drive home slowly.  When she said, "Putting it together if obviously self explanatory" I got the hint that she didn't have the instructions.

When I got home Niall was still pretty excited despite the obviously used condition.  I power washed it to clean off some of the mold then sanded the parts that had rotted, and left the swing out to dry.  I called the manufacturer (because the assembly wasn't that straight forward, at least to me.)


The manufacturer (we figured out it's an Anchor Fast Avon Swing Arbour) kindly sent me the instructions.  Armed with that paperwork, I was able to hobble together the hardware that was needed from B&Q.  I went to the lumber yard to get some replacement wood for a piece that wasn't fit for purpose.  Then roped a friend who was visiting and the girls (Margaret had wield a rubber mallet now!) into helping me assemble. Oh, and then Niall helped finishing putting it together.  We dug in two surplus pavers so the swing has something solid on which to rest.


I sanded a few more parts and then we painted the whole thing in a coat of Cuprinol.  (Brown.  Niall had wanted green to match the fence, but a test patch did not fair well.)


Niall has his garden swing! Now if we can get the grass to grow.


Cost
Swing £65 (Gumtree)
Hardware £9 (B&Q)
Timber £5 (Jewsons)
Curprinol £0 (Free!  We used what was in the garage)
Total:  £79