Showing posts with label semi-detached house side extension. Show all posts

Wednesday, May 18, 2016

Furnishing on a Budget

Yes.  So we spent a whole bunch of money getting a new room.  We set aside what I thought was a very generous amount for furnishing and landscaping.  But it turns out the landscaping is going to take the entire amount, and then some, so we are left with hardly anything to furnish the room.
There were a few things that I really wanted for the room:

1.  Corner (L shaped) sofa, long enough for two people to lay
2.  Wall mounted TV (size not very important, we are pretty pathetic when it comes to nice TV's)
3.  Storage for toys
4.  Extra seating
5.  Table(s)
6.  Rugs for two 'zones'...one for the sofa/TV area and one for the toy storage and extra seats

1.  The biggest factor, I felt, was the sofa.  For six weeks, Niall and I scoured the local haunts (mostly gumtree) for something that would work but wouldn't break the bank.  We set a budget of £200, which was too low, but what we felt we could afford.  I spent time at Ikea, looking at all the sofas, figuring out which could be switched, covers that could be used, etc.


Finally, when we were in Amsterdam, a sofa appeared.  I texted at the airport and picked it up that afternoon, not long after we got home.  It was over budget, but I haggled and we got it for just slightly over budget.  I had to move around some pieces and unpick and resew the cover, but we got a Karlstad sofa.  It's now discontinued in the UK, but it is in very good condition.

Total cost:  £223.50


2.  The TV we got by bartering.  We traded a pull-out sofa bed (that we're going to replace with a two seater Chesterfield in the front room.)  It was a pain drilling the holes for the wall mounted plate (plasterboard, battens, old exterior wall=150mm holes) but we got it mounted!  (Thanks, Niall)


Total cost:  Free!

3.  Storage for toys was provided thanks to Ikea.  We actually bought something new.  Not second hand, not bargain corner.  Kallax was £75 plus the boxes, so it fit the budget.

Total cost:  £100


4.  Extra Seating:  We pulled in the rocking chair, which had been up in the office, downstairs.  Originally, we got a Parker Knowles chair from a neighbor's skip (dumpster.)  I stripped it, recovered it, we got a carpenter to make the rockers, and ta da!  We also put the 'throne' in here.


Total cost:  Free!


5.  Shelf/Thin Console Table

The extension is long but narrow.  (Just under 3 meters/ about 9 1/2 feet)  There isn't a room for a coffee table to the side of one part of the sofa.  But I know my husband and his love of tea.  And tea cups were sure to be perched on the sofa ledge, left on the floor, or put on the window sill.  So we needed something.

The builders left behind some wood, which I cut to size, sanded and oiled (boiled linseed.)  Then we bought some cheap table legs from Ikea.


And Niall has a place for his tea cups.


Total cost:  £15

6.  Rugs

I see so many rugs that I love.  But they're all in the US.  After serious (weeks long) internet and in store snooping, I've basically decided there aren't patterned rugs that both Niall and I like that are also in the UK (and don't cost four figures.)  The next idea was plain rugs.  I pulled down an Ikea rug we have from upstairs, but Niall gave it a pass.  


So I went to a local carpet store and they had a very nice piece of carpet that was an offcut and worked perfectly.  I cut one piece for the couch area and another for the chairs and boom.  We've used carpet offcuts before, and if there's problems with fraying then a bit of glue along the edges does the trick.


Total cost:  £50  


The landscaping should start sometime next month.  And we'll work on getting some more things on the walls and window coverings!

Tuesday, May 17, 2016

Wired

Oh, adding a whole new room meant so many electronics!  But once they were placed in the room, it meant we really started using the extension.


Except there were so many wires and cables!  (Do you see them hanging down from the TV?)  I knew what needed to be done.  (Drill holes, run the cables behind the plasterboard/dry wall.)  But I was really nervous, and I don't know why.  It took me me a few weeks to get everything together and get the gumption to do it.  And today was the day.

I moved the furniture.


And I had to get the courage to do it, but I finally drilled into the wall near the TV mount with the biggest tip spade drill bit we have.    And then I drilled another one near the outlet.  (I knew where the electrics ran and avoided them!)  I straightened a wire hanger and ran it between the holes.  Then I taped all the cables to the wire hanger and threaded the cables it between the holes.


The result was not very pretty.  And very dusty.


But I'd bought two of these, so it looks much cleaner now.  Also, one is hidden behind the TV and other behind the couch, so you can't see it anyway.


And now?  No more cables running up to the TV.


Saturday, May 7, 2016

Side Extension: Completion!


We had at least a month where the extension was on 'hold'.  Timber for the front was on special order.  The joiner's van broke down.  We went on holiday.  The interior was pretty much done, but no electrics and a few snagging pieces.

Finally!  The timber arrived.  I spent about ten hours over several days painting it.  The architect had specified Sikkens in a graphite grey to match the window.  I called the Akzo Nobel hotline and spent about 30 minutes finding out what products were the best for the Siberian Larch.  Each piece of timber needed to be primed (four sides) and then coated twice.  


There were a few false starts, but then the timber finally started getting attached!  They put up a net for insects, and we were in business.


The architect wasn't super happy with the placement, so the guys made the adjustments.


And then it was installed!


I primed the new pieces and painted everything with another coat or two, cut down that weird wire (left from the old garage) and we are done!


One of the neighbors told me our house looks like Center Parcs!  (A holiday resort with cottages, apparently with timber cladding.)  The neighbor is eight, so I think it's a compliment.


Inside things are pretty much done as well.  The skirting (baseboards) got installed.  We had a little hiccup with the stringer for the stairs.  Originally, it got installed with skirting, and I wasn't happy with the finish.


But it has been redone and I like the finish just fine now.  (I do need to do some more paint touch up.  I feel like I've been painting for a month!)


Ideally we'd have consistent flooring between the kitchen and the extension.  But we do not love the dark bamboo in the kitchen (it scratches so easily, and shows) so we'll just keep it like this for now.


One half of the extension has seating and toys.


And the other half has a sofa with the TV.  I still need to work on finishing touches, but the hard work is done!  The cat has adapted to the new space quite well.


I mailed the building certificate application yesterday (we finally got the second fix electrics) , so we'll see what building control says.

And just because I like numbers, here's the final costs.  All in (this does not include furnishings or the landscaping.  The garden work has been partially completed, we're trying to do some ourselves and a the professionals should come in June) the cost is just under £40K.  That means the build was £1,448 per square meter, which is what we'd been told from the beginning.  (£1,500 psm.)


 Build   £26,136
 Ground Works   £11,082
 Planning   £1,880
 TOTAL   £39,098

And the timeline:

September 2013:  Planning application submitted
November 2013:  Planning application approved
February 2015:  Building warrant application started
July 2015:  Building warrant application granted
July-Oct 2015:  Quotations, change details per budget, confirm builder
November 24-25 2015 :  Garage Demo
December  14-18 2015 :  Dig Foundations
December  23-24 2015:  Excavate Back Patio
January  8-22 2016 :  Foundations and Drains
Feb 29- March 30 2016 :  Framing, block work, roughcaste, interior
April 7-8 2016:  Skirting and gutters
May 4-5 2016:  Cladding, skirting, snagging
May 6:  Completion certificate form mailed!

Sunday, March 13, 2016

Side Extension: Blockwork, Propping and Knocking Through!

The extension is moving full steam ahead.  The french doors went in (these ones actually need to be changed, they are backward, but they do for now.)  Originally we had fancy concertina doors, but the budget lead us to UPVC french doors instead.  They should do just fine for little kids opening and close many, many times.


The brickwork has gone up this week as well. Originally the extension was going to be all timber, but Building Control wanted bricks for added fire protection  It meant we lost some internal space, but it made the Council okay with the design.


The whole external wall (facing our neighbours) is going to be rendered.  So breeze block has been used.


The front aspect of the house will be clad in timber, so it isn't being blocked with bricks.


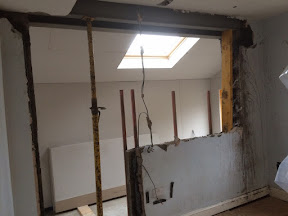
When the brickwork was completed, they decided it was time to knock through into the house.  I didn't realise they did external walls in two phases, but our builders said it was the norm.  On Thursday, they propped up the house and took off the first skin of bricks.  (External)  We have caviity wall insulation, which is what all the weird grey stuff is in this photo.


The skin of bricks came down, and the first RSJ (Reinforced Steel Joist) went in.

On Friday, the final layer of bricks came out, the RSJ went in and the extension and house were locked together.


Did I mention we're having a cat door built into the wall?  Yup.  It's kind of a high entrance on the outside, but works on the inside.  We'll perhaps put in a step when things are finished.  The cat has managed to use it as is, though.


A few more pictures of the hold in the wall.


The builders have been boxing in the room, with insulation and plasterboard going up at a pace.


The french doors (installed backwards) with the glass.  The cat door is currently covered in plasterboard.


Just as an FYI, we knew knocking through the wall would be dirty, dirty business. We  cleared everything out of the dining nook and put up some very thick poly sheeting.  


And for good measure we duck taped around the boiler closet.  The tape will probably take off the paint, but I'd rather repaint than deal with all the dust.  I taped the plastic to the floor as well, plus covered the light and the outlets, and it worked pretty well.


Here's a view of the hole from the kitchen (in front of the plastic.)

Here's a view of the hole from the kitchen (behind the plastic.)  There is still a lot of dust settling and, though insulated, the extension doesn't have a proper roof (or flashings) or radiators, so it's quite cold.  The plastic doesn't keep out all the cold or the dust, but it sure does a better job than nothing!  It will probably stay up for at least a few more days, while the guys hang more plasterboard and knock about this and that.


Sunday, March 6, 2016

Side Extension: Timber Frame

On Monday, the joiners were on site and things have moved pretty fast.  Within a few hours the wall frames were constructed.


We're going to have a window in the front.  And french doors in the back.


The next day the roofs started.  And a lot of conversation ensued.  


I got lost in all the technicalities, but here's the summary:

-We were going to use cement tiles for the roof, but our local roofer cautioned against them (weather and winds) so we switched to a slate tile.
-Roof pitch had to be slightly adjusted (from 19 degrees to 22 degrees or so) because of the change
-We were going to have a warm roof design (I think) but the builders and roofer made a compelling argument to switch to the cold roof design.  (Apparently better for the slate and Scottish weather.)  


The joiners kept at it all week, adding the rest of the timber for the roof and prepping the timber frame for the wall of blocks Building Control is requiring for fire control.  Here's a picture from the back.


And a photo of the extension from the rear/side.  The extension juts out about a meter from the original house.  We're putting in a window on this aspect to introduce more light.


Towards the end of the week the guys were prepping the roof for the slates.


And putting in the two new roof lights.  Niall keeps talking about how we'll be able to sit in the extension and look at the stars.


Apparently the extension is moving full steam ahead and the brick work, windows, roof and knocking through the wall between the kitchen and the extension are scheduled for next week.